

DISCLAIMER: Links included in this post might be affiliate links. If you purchase a product or service with the links that I provide I may receive a small commission. There is no additional charge to you! Thank you for supporting me so I can continue to provide you with free content each week on my blog and on my YouTube channel!
There are so many Instagram features and tools that people don’t know about or talk about.
In this post I’m going to go over those Instagram hacks you don’t know about, including a secret to tripling your story views, scheduling Reels to auto-post and auto-generating your captions.
Recovering Deleted Content
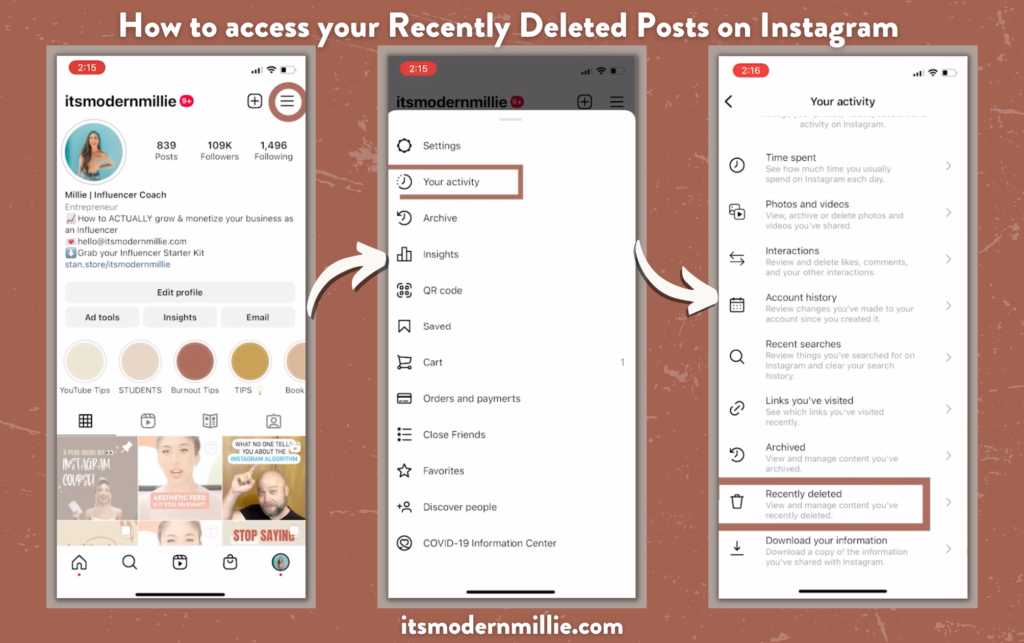
This first tip is how you can recover posts or stories that you’ve accidentally deleted.
To do this, you’ll first go to your profile, click on the three lines on the top right and select “Activity”.
In this section, you’re able to view all of your activity within the app: posts you’ve liked, posts you’ve interacted with in any way, time spent on the app, etc.
Another cool thing you can do here is view posts you’ve deleted by clicking on “Recently Deleted”. (Very aptly named.)
Here, you can view and recover any Reels, In-Feed Posts or Stories you’ve deleted within the last 30 days. If you don’t recover in that timeframe, they will be permanently deleted from your profile.
The Instagram Algorithm Communicates Directly to You
Did you know that Instagram will literally tell you their algorithm upfront? They are very transparent with why they show you each post.
If you ever come across a post and think, “Why is Instagram showing me this?”, you can actually find that answer.
How to See Why Instagram Shows You Posts
All you have to do is click on the three dots in the top right of the post and select, “Why you’re seeing this post”
It’s as simple as that.
When you click that, Instagram will tell you exactly why they recommend that post for you. There are many reasons why Instagram will show you a post, but I’ve provided a screenshot for you as an example of what they might say.
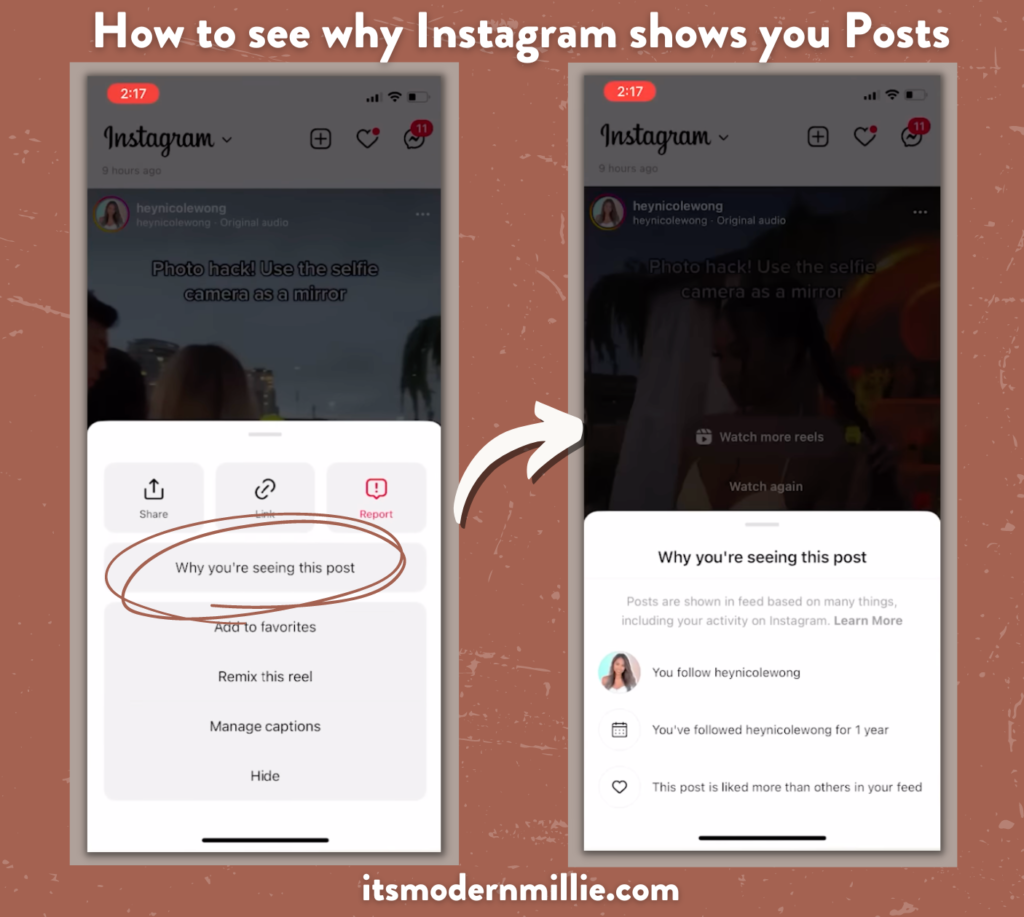
You can see that Instagram recommended this post because I follow the account, I’ve been following them for over 1 year and this particular post is liked more than others in my feed.
Pretty cool, huh?
This can offer you great insight into why your posts may be recommended to your audience.
Auto-post Your Reels
Instagram recently announced that they’ve released their API (Application Programming Interface) so that third-party platforms can integrate this tool into their platforms.
So, any platform that has the ability to schedule posts on Instagram, like Metricool can now schedule and auto-post Instagram Reels.
This way you can create content and then schedule and post it while you’re sleeping, working or on vacation. You don’t have to be “live” to post.
A lot of people have mixed feelings about using third-party tools and that it tanks your engagement.
Personally, I’ve tested this out for myself and noticed my scheduled posts don’t perform as well. But that might not be your case, so test it for yourself!
But if you work full-time or aren’t able to actively post during your optimal time, this feature is a great option and can help you tremendously.
One thing to keep in mind with auto-post Reels is that there currently isn’t a way to upload or add an audio that you’ve already saved on your Instagram account.
So all the audios you’ll be uploading and scheduling will be your own, original audios.
Let Your Stories Expire
If you’ve been wanting to increase your Story engagement, this is a hack you can use to spike your engagement.
I’ve been talking about this tip on my YouTube channel since 2019 and it still doesn’t get the credit it deserves.
Let your stories expire!
A lot of people say you need to post on your Stories consistently, every day, always interacting with your audience there. And that’s great. I try to post on my Stories every 2 hours or so.
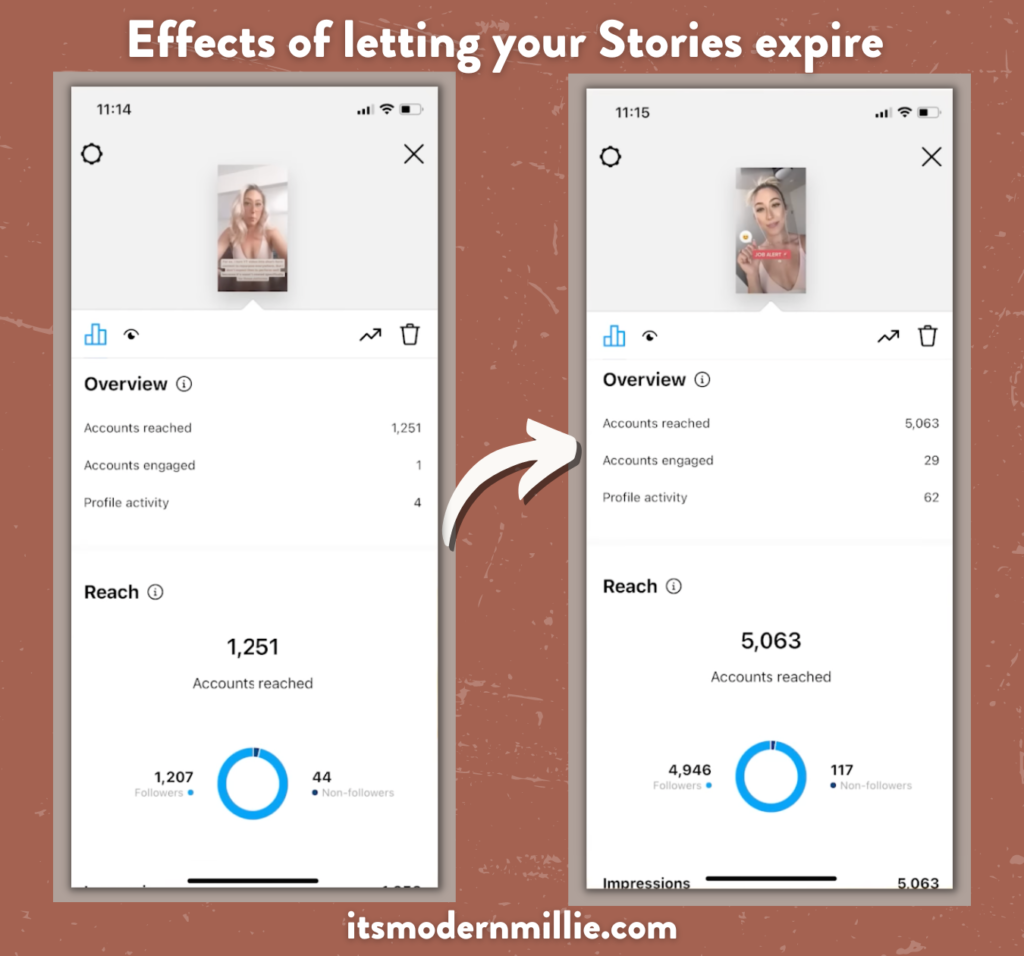
But if you notice a gradual decline in views and engagement, your Stories need a little refresh.
Stop posting Stories, let them expire and let the algorithm reset.
Then when you come back to Stories, what you’re going to do is have a Story that shows your face. That way it’s personal and interactive and people immediately know it’s you.
Also include an engaging poll or sticker so that people interact directly with that Story.
Those two things together will help you skyrocket your Story views.
Your Stories Archive
When you’re on your profile and you press the three lines on the top-right, click on “Archive”.
Here, you can select through Stories, Posts, or Live Archives. If you don’t have the option to see your Stories Archives, you have to turn it on, which you can learn about on Instagram’s Help Center.
I love being able to see my archived Stories, especially in Calendar View. If you ever need to refer to Insights from Stories you’ve posted in the past, the Calendar View in your Stories Archive is a lifesaver!
You never know when your Stories Archive can come in handy.
Let’s say that a year ago you organically talked about a brand you love. Not as a brand deal, but because you love them and it fit the context of your Story.
Now today, you have an opportunity to do a paid collaboration with them. Providing them with Insights of your previous mentions of them can go a long way in solidifying that partnership.
So turn on your Stories Archive and familiarize yourself with it.
It will help you in the long run, especially as your start pitching brands and landing paid brand deals.
Turn Your Reels Series Into Guides
I feel like Guides are often overlooked and underutilized.
What I love doing is when I post a series onto my Reels, like my “Brands that pay Influencers” series, I organize them into Guides.
If you go to my Instagram and go to my Guides, you can see I’ve organized some of my Reels into one place.
Similar to how you can create playlists on TikTok. (I’m sure Instagram will integrate playlists eventually, but for now, we have Guides.)
Continuing the example of my “Brands that pay Influencers” series, you can see my Guide on that topic here to see how you can restructure your Reels into Guides.
How to Create a Guide on Instagram
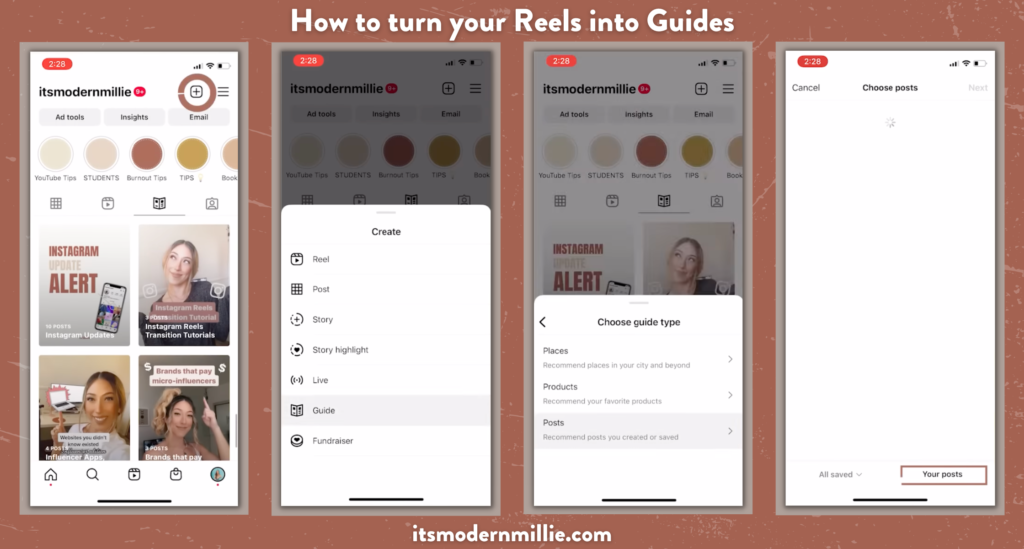
Creating a Guide on Instagram is really simple.
Just select “Guide”, choose “Posts” and then click on “Your posts” at the bottom to choose from your posts.
This is where you’ll select the posts that make sense for your Reels. Then all you have to do is add a title and a description and you’re good to go!
Reels Templates
Speaking of Reels, a new feature that Instagram recently announced is using Reels Templates.
This is honestly so easy to use and I’m stoked they created this.
How to Use Templates for Instagram Reels
To access this feature, you’re going to go to the Reels tab (the bottom of the screen in the middle) and start creating your Reel from there.
After pressing the camera in the top-right corner, you can see at the bottom where it says “Reel” or “Templates”.
Click on “Templates” and you’ll see pre-created Templates that help you time your videos to the audio.
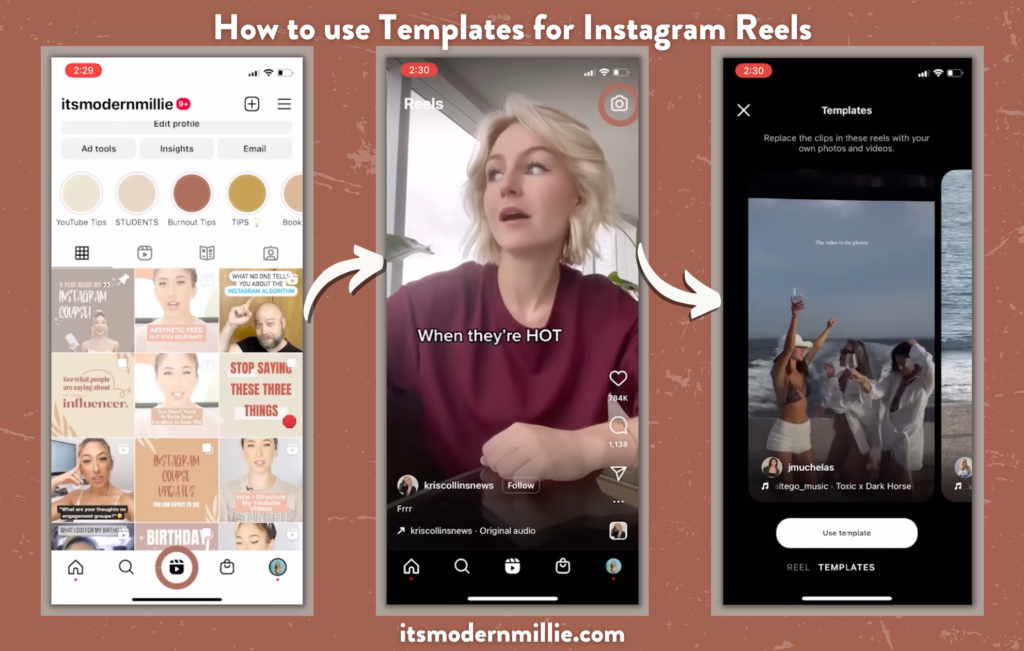
After clicking on “Use template”, you’ll see a bunch of clips at the bottom. These clips are already measured out for you with the proper timing to go with the audio.
All you have to do is upload your own clips and it will time it out for you perfectly.
It’s super easy because you don’t have to do any work other than film your day. At the end of the day, you just select your template, upload your clips and post.
Not only is it easy, but you can strategically choose Templates with trends, which can help you increase your views and following on Reels.
If Reels, with the intricacies of timing and editing, intimidates you, start with Templates!
Captions on Stories
I get a lot of questions from people asking how I make my captions pop up on Stories or how I auto-generate my captions.
Most people don’t know it’s a feature within Instagram.
Once you’ve recorded a Story, click the Sticker button in the top-right and click on the option that says “Captions”.
This will transcribe your audio to auto-generate for you.
Just like with adding text to your stories, you can change your font, text size, text color, background color, etc.
If the transcription gets a word wrong and misspells a word, you can tap on the text and edit specific words.
Countdown to Hands-Free Recording on Stories
Most of you know of the Hands-free recording option on Story.
To do that, you click on the arrow on the left and select “Hands-free”. Now you can tap the record button and you can use both hands as there’s no need to hold onto the record button.
Boom. Easy. But you already knew that.
What you may not know is that you can go even more Hands-free.
If you really need both hands, you can hold down the record button, a 3-second countdown will start.
Correct, not every Story has to start with you leaning over to press record. It will countdown and give you 3 seconds to position yourself wherever or however you please.
Repurposing Your Content
The final hack I have for you is one of my favorite things ever: repurposing content.
With Repurpose.io, you can integrate a workflow with any of your main social media platforms. I have it integrated with my YouTube, Instagram and TikTok.
To create a workflow, you start by setting up the main source and then selecting a destination.
For example, any time I upload a Reel (source), the destination will be TikTok.
Repurpose.io is a tool you have to pay for, but you can always start with a free trial to test it out. It could be worth it since it streamlines your content creation process and makes repurposing your content so easy.
Which of these Instagram hacks is your favorite? Do you know of any hacks that I didn’t mention here?
Let me know in the comments! I always love chatting with my readers.
Follow your joy!

")


Contact Leonardo today for any infidelity Issues.
He helped me to get into my husband’s phone remotely and he helped me to gain justice to my husband’s infidelity activities. He is professional and nice hacker to work with …Contact him on his email for hire or to know more about his services
Leonardomitnickhacking@gmail. com